This is a very, very specific situation... but posting in case it helps someone else. You never know. I won't be DenverCoder9.
When I got the Dell I was struggling a bit to find the right cable to hook up the monitor. That USBC stuff was all new to me. So I got a DisplayPort cable and set the ASUS to use that.
I pretty much never shut off a laptop at night but just leave and let it go to sleep mode on its own. But I began to notice the monitor turning its backlight on and off, frequently but not always regularly. And it was bright enough that when I had insomnia (rather frequent starting around 2018) it would really annoy me.
There must have been some signal coming from the XPS13's USB port that was enough to wake up the ProArt, but obviously since no actual video data were sent, the monitor would go back to sleep. What I was seeing was the ProArt's power light going from orange to white (active), the backlight would go on, then after a moment a little window would come up with "No Signal" and everything would shut off. All the USBC ports caused that behavior.
I could unplug the monitor from the USB port but that didn't seem like an elegant solution. I bought a USB on/off that was actually meant to turn off the USB port on a Raspberry Pi, and that did not work at all. I bought a switchbox that was supposed to allow two computers to share a monitor, figuring that I could just switch the monitor to take its input from a nonexistent computer. That did not work at all either.
Then while dicking around with the monitor, I accidentally set its input to the VGA port. And got totally stuck because there was no VGA signal, the monitor wouldn't display the menu. I had to RTFM to get it back to taking input from the DisplayPort port. And that's where I found the solution to my problem.
Just above the power button is the input selector. Its icon is an oblong with an arrow pointing into it. Clicking it cycles through all the input ports. All I have to do is tell it to take input from something that's not DisplayPort, and since there's absolutely nothing coming in there, it never wakes. It seems to be easier on the XPS13 as well, since unplugging the external monitor would cause the laptop screen to wake up and display. Now it just stays black.
It's nice to solve stuff without having to spend money....
Nordinho is kind of an old school forum so things are not super easy to do sometimes.
You'll need:
a screenshot of the game saved on your computer
the URL of the game (copied from your browser)
This should really be done from a desktop computer. It's possible to do it from mobile, but it's definitely harder because of the screen size.
Up near the top of the games list, click the NEW THREAD button.
You'll get the next screen. Write some stuff in the title block (usually the name of the game and the author), and a description of the game.
You can simply paste the URL of the game directly after the game description. But if you want to make it look tidier, such as a single word "Play" as a button, you can use the link button indicated in the image below. Type the word "Play" (or whatever text you want to use as the button), highlight it, then click the link button.
A window will pop up, which is prefilled with "http://". Since we're in the 21st century and we do things securely now (or at least hopefully), erase that and paste the game URL.
Clicking OK will close that popup. You will see some messy looking text with square brackets and quotes have been added around your URL. Don't delete this stuff, the Nordinho website needs it to create that nice looking link.
Now you need to add your screenshot. Scroll down until you see "Addtional Options". Click MANAGE ATTACHMENTS.
Another window will pop up. Click the CHOOSE FILE button which will open your file manager and select your screenshot from your computer. Then click UPLOAD. It may take a few seconds but your file name should show up in the area above where it says "Attachment key". Click CLOSE THIS WINDOW or the red X box in the top right.
Just a note: there are file size limits to what you can upload. If your screenshot is too large you will see an error message show up below the words "Manage Attachments." If that happens you need to find a way to make your screenshot file size smaller before you can use it.
That's everything you need to enter! Scroll down and click the SUBMIT NEW THREAD button and you should see it in the forum right away.
Google Cloud platform made some changes to its TOS which resulted in charging me $100 for 1 month of PlayMapTag. A handful of people around the globe play it, but apparently the Maps API access charges exceed the monthly credit by that much, and I don't want to be paying that amount each month for what was a fun learning project. And I'm not about to put advertising on the website, which would probably not offset the cost anyway.
The Maps API was used by PlayMapTag and Tacotacotruck (which probably nobody used anyway and was probably way out of date, so no tears were shed), so I took down both of those.
Had a really good run and a fun time with these projects. I'm not sure there's any way to hit the API less. Streetview, which nearly all of what PlayMapTag was using, is very data intensive as you can imagine.
I just played a game after several months' hiatus and discovered labels all over the StreetView. Well, where's the challenge in that? Thanks, Google! So after poking in the API for a few minutes, I found a StreetView panoramaOption called showRoadLabels. Easy to fix, but it makes me wonder if I am going to have to play MapTag for the rest of my life to check on API changes.
Note: there's an in-game help system that will get you through the whole game plus the second ending. You must watch an ad each time to view the help. I assume this generates revenue for Hozumi, and I urge you to open up the help a few times and play the ads anyway because he deserves to be rewarded for these fantastic games that are otherwise free. If he doesn't get enough ad revenue he might have to charge for all his games. And we don't want that, now do we?
First once-over: Ghost leg puzzle, a panel in the wall covered and secured by bolts. A 3x3 cabinet with tools, which you can (initially) only take one at a time. Take, of course, the wrench. Next wall has a door and keypad with missing keycaps. Last wall has 3 keys locked away behind domes.
Open the wall panel and take a keycap, and place it on the keypad.
Solve the ghost leg and enter what would be on the top into the keypad, and press Enter.
SEAECP.
Door will open
You're in a very dark room with just 1 lamp. Get closer and take another keycap. You'll need help seeing in this room, and there is one item in the tool cabinet that can help you.
The camera.
Take that and enter the room again. Use it, then look at it in inventory.
You'll see a note with the word
CAST, with sort of a sun symbol.
Go out to the keypad, add your keycap, and enter
CAST.
Let there be light!
Check out the room: A book that opens. A "clock", the hands of which will cycle through positions when the button on top is pressed. The sequence
of dots is 1, 5, 3, 4.
You can also collect a battery from the clock at this time. Under the bed, center drawer, is an "O" keycap. The drawers on either side of the center drawer are stuck, but play with the middle drawer some more and
you'll find they are blocked with screws.
Next wall to the right is a large locked door, and a chain. You can yank the chain if you like :) Ooh, secret TV!
Next wall to the right is a water dispenser with red and blue buttons, and some words that may or may not be helpful.
Next wall to the right is a hatch, and a cabinet wired shut.
Go back to the first room. Take the screwdriver and open the left drawer, and take a lens. Return the screwdriver, take the camera and put the lens on. Take a picture of
the cabinets
and you'll see a code. Return the camera and take the dice. Click on the faces (there will be no audio feedback when you click, though) for a pair of cutters. Also click the faces
according to the clock
for a second battery.
Return to room 2 and open the wired cabinet with the cutters. Get a - screwdriver and a keycap. Also take a look at the photograph and how it compares to the one on the wall. Use the - driver on the drawer and get a hook (it is not visible :/ just click inside the drawer).
Return to room 1. Swap the - screwdriver for the + driver and take the remote. Put the batteries in and use it on the picture to get a code. Rearrange that code
according to the photo in the Room 2 cabinet
and enter it in the keypad. You can now pick up two items from the 3x3 cabinet.
If you have picked up and looked at all the items you know that one was meant to be used on the other. If you haven't guessed, it's
the pyramid and the hammer.
You'll get a keycap and a dial. Don't use the dial yet, though. Take the ball, attach the hook, and hang it on the chain. Take also the remote and use it on the TV for a red/blue pattern.
Return the ball and the remote, and take the spray bottle. Put it in the water dispenser. Note the spiral diagram which will tell you how to press the pattern.
RBB BRR BRR.
This will fill the bottle. Spray it on the book. Take the camera and take a picture of the book for another code.
You will need to put the dial on the thing below the ghost leg and turn it before that code will have any effect. Your inventory items will disappear. Go ahead, take all the keys.
I didn't really care for this part too much because the clues seemed pretty vague, but TBH if you're familiar with Hozumi's games, vague clues are kinda par for the course, especially in his longer games.
You should open the door with all the keys just to get a sense of the environment. Use the Wise key and
turn off the light.
Use the No Name key for the clue as to where to put all the keys. You should do them in the order listed as well.
The Fool Sits Far From the Moon: open the door using the Fool key and
face the moon (the exit hatch). Turn twice so you are facing away from it. Step forward until
you come to a chair. Set the Fool key on the chair.
The Wise Sits in His Hideaway: that key goes back to
its niche behind the dome.
The No Name Finds His Seat: open the door using the No Name key and
set it on the chair.
Second ending:
After you exit click the cube at the top left corner and click return. Take the key from the chair, which will make the entry door reappear. Go back into the room and enter
the hatch. Face away from the moon
and keep going until you come to a room. There are some green words on the wall.
If you've looked at the keys you noticed there are
letters on them.
Use this to click the words on the wall. This will turn the lights on, and now you can see a keypad on the wall.
Have a look at each of the shapes and the shadows they make. The words on the wall said
I was surprised at how emotional this made me. Going up the elevator I felt tightening in my throat, and several times more as we filed out to the entrance hall with the sliding windows and watched the slideshow projected on them. The strength of my reaction seemed disproportionate: nobody I knew was directly involved in the event or witnessed it personally; at the time, I had one friend attending Columbia, but he was unaffected. I had watched the event unfold on TV, but when I deemed that I was getting late for work, I turned it off and got in the car. At work, it was unusually quiet. Our office at the time was a huge single room with cubicles, and I could hear someone near the front weeping. I never found out who that was. A few days after the planes destroyed the buildings, the newspaper delivered a flag, printed on 12x18 light card stock. I put it on the mantel and felt strangely comforted by it.
I wouldn’t consider myself seriously patriotic. I was born here, I live here. I like to think I’m reasonably objective when comparing my country to others. There are countries more sane than the United States in a multitude of ways, and there are many countries that are far worse. The United States has not always been welcoming to both my race and me as an individual; I’ve had my share of racial slurs thrown at me, received the micro~ and macroaggressions that call me a foreigner, outsider, and/or second class citizen, been told to “go back” to a country I’ve only seen as a tourist. I’ve been expected to disavow others of my ethnicity because they are immigrants and I am not. And I'm well aware that Asians in other states have it worse. But in the end, I’m an American, I live here, I love California’s weather, diversity, culture, food, and its high proportion of intelligent people, and I’d find it very hard to give up that winning combination.
We walked around the observatory looking over Manhattan and beyond, looked straight down onto the former footprints of twin towers, now fountains waterfalling over black stone, inward to a square dark hole in the center. It’s symbolically beautiful and appropriate.
I think what makes me emotional, what makes me mourn, is not the event itself or the lives lost there, but how it changed this nation so much. We’ve had acts of terrorism before -- from Timothy McVeigh, the Army of God, animal rights terrorists, and the Jewish Defense League, just to mention events in recent memory. But 9/11 indelibly associated terrorism with Muslims, Islam, anyone from the Middle East regardless of their religion, and even any bearded, brown skinned person. 9/11 created the TSA and its security theater. 9/11 divided the United States. One side believes fear is justified, that the nation is under attack, that the Christian religion is under attack, and any measures to protect the nation are necessary. The other group sees terrorists as small groups of people using their religion as a justification for violence, and do not represent Islam as a whole, just as the Westboro Baptist Church, which uses Christianity as an excuse to be as offensive as possible, does not represent all Christians. The United States is no longer the land of the rough and ready, optimistic people who throw in a helping hand and get things done, people who believe every problem has a solution. It seems decreasingly possible to compromise; people now insist on expressing their views, sometimes at the expense of others. Everything has spin. People seem far more inclined to put others in a box in order to more easily dismiss views they don’t agree with.
I’m just describing my thoughts/concerns. I don’t have answers or solutions for how to get our mojo back. But I do feel we have to get back to seeing our country as belonging to all its citizens and those who want to become citizens -- not just those who ascribe to our own views. We have to find the middle, the common ground; rate our individual desires by importance and be willing to let go of the less important ones in the interest of unification.
I'd been trying to avoid it, but the new version of Google Maps has made it really difficult to get exactly 1000 points in MapTag. It used to be you could step out of the StreetView and it would leave your marker on the point where you were. That doesn't happen anymore; instead, to get your most-precise location you have to rely on the tiny thumbnail in the bottom left. And it's annoying, so I'm planning to widen the high-score area from 2m to maybe 10m.
We need 3 shapes.
Turn left to the square. On top is
a ruler, and a bunch of shapes.
Place the ruler
on the shapes.
There's a solid triangle in the left and a solid square on the right. Note the symbols between them.
-||-, WWW, circle with a dot
Go back to the cross. Insert your keys
triangle key in the left keyhole, square key in the right keyhole.
Change the symbols as appropriate. Press the blue button. This opens a door.
Next room.
Photos on desk: “center” on left side of photo 1, “right” in middle of photo 2, ‘left’ on right side of photo 3.
Desk drawers. Right locked with a bolt on the side. Center has paper with
1 2
3 4
5 6
Left drawer needs 4 symbols to open. Clock on shelf uses same symbols for drawer. Left right buttons trigger a move to a symbol (or the 1 o'clock position with no symbol) every 3 presses.
Picture on wall: 7 red blocks left to right at heights 3,2,3,1,1,3,2
Use these heights on the
3 drawers
to get a wrench. Use the wrench to open the
right drawer
and get a red circle key.
While the drawer is open, click
the side
to see another set or symbols. This indicates to use the
square and circle keys
and the symbols
nnnn, |<|, sinewave
This opens another room.
Take the stool and have a look at each of the windows to see 4 arrow sequences:
LLR, RLR, RRL, RLL. Note also the scratch marks below each, pointing
L R R L
When you click these on the clock (later) they will give the corresponding symbols
tree, spiral, eye, mouth, but if you click the first and last
[I]backwards[/I], you will get
mouth spiral eye tree
Open the
pipe with your wrench
and take a knife.
At this point you can toggle between the rooms just by clicking the blue button, no need to change the keys and sequence. I think those sequences are just for "unlocking".
Go back to the desk room and use the knife on
the picture, twice
to get another screwdriver blade and a pair of glasses.
Use the new - screwdriver on
the left side of the cross
to show 3 keyholes labeled
L, C, R
The photos on the desk will tell you the order of the keys here.
Square, circle, triangle
This turns on the eye. If you put on the
glasses you can play with the eye, but it's not especially useful right now
Use your stool and
have a look at the lamp
at the top of the post with the 3 drawers
Another sequence:
Triangle and circle keys, with double-dot, ground, and circle with an X.
Now you've got a room with 4 paintings, each with a pretty ridiculous caption, and a button. Write down all the number sequences, and map them to
the paper in the middle desk drawer.
You'll come up with numbers 1..4. From left to right
3, 2, 4, 1
Click the
painting buttons in that order
and the lights will come on.
Now you can see this is the exit door. Use your glasses on
the painting captions
and you'll get 3
color sequences
BBB, RBB, GGR
Using those color sequences
on the eye, you'll get 3 positions for the square, circle, and triangle. You won't need these until the very end.
There's pretty much nothing left to solve but that stupid drawer!
mouth spiral eye tree
Take a gold key.
Toggle rooms to the exit room, and take your shape keys back.
Unlock the gold lock and you'll see a bunch of keyholes.
Place your shape keys in the positions indicated by the eye and you are out!
SECOND ENDING
After completing the game, get back to the main menu, click the cube at the top left corner and select "Resume." You will be placed in the main room, looking toward the exit room. Turn right and instead of the eye in the picture, you'll see an image of the office room. Click on it and you'll be placed in the office room.
There are a bunch of cube objects on the shelves that can be turned different directions. There is one item you can pick up
a telescope
Have a look at the exit door and open the hatch in the top. Have a look at that far distant object. It is a
another cube object
Back out and look at the lock on the door: you will need a 5 digit number to get out.
There are 5 columns
on the block you see in the door.
This is going to be a bit of a stretch to try to explain it verbally, but you are wanting to match the color or colors in each
column
to a block on the shelves.
If you played with the blocks already, you might have guessed in this direction. You're on the right track. A block forms
a number
in certain orientations.
The order of the digits is, of course, the order of the
This is an evil, terrible game. You have a countdown clock starting at 99. When it gets to 0, you lose. This is the only time you can reset the game and start over, which makes writing a walkthrough a very, very slow process.
Even though it's only 4 rooms, you'll definitely want to draw a map. There are multiple sets of clues in the second room and it's hard to keep them all straight. Several solutions are direction-oriented as well. The rooms look very similar, so it can be disorienting.
If anyone understands the logic or has found the clue to the solutions I don't understand, please post it. I hate doing stuff and not understanding why.
Room 1
Turning through the room: A plant and a door, a screen, the exit door and a drawer, a pair of dots on the wall.
Open the drawer by the exit door to find a box with 3 buttons, and a book with the clue 1 > > < < 5
Click the center of the front part of the drawer, just above the knob. That unlocks the knob, which I'll call a pin, and you can remove it. You'll eventually get 3 pins in the game, and their colors can be changed by using them in the dots on the wall. The doors can only be opened by a pin of its matching color.
You can also put the red pin in by the screen, and you'll get a + displayed. Clicking above, below, left, or right of the + will cause dots to be displayed, but you really can't do much with that right now.
The next door is blue, so put your pin in the blue wall dot, then open the door to room 2.
Nearly everything in room 2 is a clue for something. For right now just take a vase.
Go back to room 1 and insert your blue pin by the screen. You will see a - , which allegedly implies a shelf.
"North" is to the right as you enter room 2, the wall with the red door lock. Count the number of shelves on each wall.
Starting north and going clockwise,
7 4 5 6
Get a blue triangle. Take your pin back.
Face the room 2 door and open it, but do not go through. Use your triangle on the door to block it open. Go back to room 1 and change your pin to red, then go to room 2. Open the next door to continue to Room 3.
Room 3 -- opening the drawer in the wall.
I do not understand the solution here; I found it on a Chinese page news.4399.com/gonglue/jjhttyx/xinde/m/556729.html . It has to do with the blue, pink, gray and yellow panel in room 2, but if there was any clue to achieve this sequence, I don't know what it was.
Face the yellow button on the wall
step forward and it turns blue
step back, turns pink
turn R, there's a pink dot on this wall.
turn R, gray
L, pink
R, pink
R, pink
R, then step forward. The button now looks like a target, and the drawer will open.
Get a screwdriver.
Go back to room 2 and remove the screw in the panel with the pin. Take the pin. Insert your red pin in its place. Look around and count the number of shelves intersected by white vertical lines on each wall. Also, while here, count the number of white vertical lines on each wall.
Go back to room 1. Insert your red pin in screen: +, # of shelves intersected by lines.
As before, "North" is the exit to room 2, with the red door lock.
Starting north and going clockwise:
5 2 4 3
Get a red ball. Take your pin back.
Room 3 -- what to do with the ball
The purpose of the ball is to give you a color sequence for the box in Room 1.
Each wall in room 2 has two groups of books, creating a count from 1 to 8.
These correspond to the holes in the wall in room 3. Starting point is the wall with the drawer.
If the ball is dropped through the holes it will change colors to red, yellow, or brown.
Following the book count sequence,
you will end up with
RRRBBYRB.
Use this sequence on the box and get a wrench. Use the wrench in room 2 and uncover another set of color dots.
If it isn't there already, take your blue triangle back and use it to block open the door between 2 and 3 (red lock). Use your red pin on the green dot to make it green. Proceed to room 3 and open the green door to room 4.
Room 4
Stick your blue pin in the fountain straight ahead and fill your jar. Take back the pin when you're done.
Go back to room 1.
Green pin in screen: |, # of white vertical lines on each wall
Starting north and going clockwise: 2 2 3 3
Get a green cube.
Time to tackle the little house in Room 2.
Go to the plant in room 1.
Use your water to turn it all green.
The branches indicate directions. The arrow at the bottom indicates to start at the bottom and go up.
.....6
3......2,5
..1,4,7
Go to room 2 and put your cube in the little house, then click the sequence. You'll get one last pin. Take your cube back.
Take the new pin to room 1 and color it red, so you have pins of all 3 colors now. Head toward room 4, taking your triangle blocking the door as you go.
Go to the door diagram in room 4. Place your pins, starting from north and going clockwise,
BRG.
It opens a door back to room 1.
Go to the panel with the spaces for your 3 objects, place them, and take the key.
Finally, on the wall click the following buttons:
>>, >, ●, ■ , << .
(Props again to news.4399.com for this answer.) The TV will go on and display 99. Your timer has also reset to 99.
While your timer is still on 99 you can use the key and exit the door. (If you go wandering off and your timer falls below 99, you can press the sequence again and reset back to 99.
(Postscript: it occurs to me that the numbers on the three shapes (B=2, R=3, G=4) are actually telling you where to place them around the door. Which implies the number order of everything does not start at north, but rather west. I'm not going to go back and check it out, but it's possible this makes things more sensible? We leave it as an exercise for the reader ;) )
This one is long and a bit confounding. But brave escapers will prevail!
First floor: Quick look and easy item pickup:
“3” on the wall
can be rotated,
and a ladder we can’t go down due to fire
3 dots on the wall, and a lightswitch. You can take
one of the dots.
Another 3 dots you can zoom in on, but nothing there as yet.
3 levers with green buttons.
Make magic happen: turn off the lights
Look through the 3 dots on the wall and view a branch with 6 leaves, the sun, and 4 trees. Ok, so not that much magic. Lights on.
Play around with the “3”. Note that the switches change
colors depending on rotation.
W = Green Yellow Green. E = YGG. M = GGY.
Hozumi leap: consider the leaves, sun, and trees, and the colors of the levers.
Rotate the “3” to match
so they are GYG.
Then think about the numbers you’ve seen. You have 3 levers and 3 numbers.
Click the levers the number of times indicated (6, 1, 4).
The ceiling will open up and you can climb the ladder.
Second floor:
The sun on the wall, and a chair with a book. The book reads “cyan magenta yellow black”
Turning left, a sofa and lamp. Nothing to find here.
The ladder and the “3” on its back (echoing the figure on the first floor).
A bed, a yellow tube, and a table. The drawer is empty.
There doesn’t seem to be anything to do here, so let’s continue up
Third floor:
The sun on the wall, a chair, a mousehole, and a balloon.
To the left, a sofa and floor lamp, and 3 locked cabinets on the wall.
Next wall, 3 on its back, and a cloud.
A bed, a yellow tube with a hole in it, a nightstand. The drawer has 3 indentations on it. You can insert your disk here, so you’ll need to find 2 more. Click some more and you will also find
2 screws on the side.
There’s also a light switch here, so do
lights-out magic. Inside the mousehole is a chair, a lamp, and a drawing of cheese on the wall.
Also, look a little more closely at one object we’ve been using over and over.
The ladder. At the top you’ll find
another black dot, and a flashlight.
Go ahead and stick the dot in the nightstand, and check out underneath the bed and sofa. (Sorry, nothing!)
Keep using your flashlight on other floors. You’ll find a black dot
under the bed on the 2nd floor.
Bring that back to the 3rd floor nightstand and open it to get a roll of tape. You should fix
that hole
in the pipe.
Fiddle with the lights and rotate the “3”. You’ll discover 2 things:
If the 3 is in the “M” position, the 2nd floor M is purple. Clicking it turns the room purple.
With the 3 in the “3” position, the 3rd floor 3 is clickable, but doesn’t do anything.
Let’s go check out that purple thing. Turn the room purple, turn around and a moon with 6 stars has appeared on the wall. Also you’ll see 3 groups of numbers on the wall:1-2, 6-4, 5. Keep this in mind for later.
On the 1st floor, turn the lights off and take a look
through the three holes. Y
ou now have 3, 7, and 1 star in purple rooms.
Notice the switches are
all purple now. Do like what you did earlier with the switches.
Go up to the 2nd floor and grab a screwdriver.
Turn the “M” off.
Back to the 1st floor. Rotate the 3 to the 3 position. Go to the 3rd floor and you can solve the cabinets
Click the 3 cabinets in the order indicated
(1-2, 6-4, 5). For 3, click the 3
Get a slingshot frame. Remove the screws from the right side of the nightstand and open the drawer further. Get a rubber band and note in the book a drawing of a cloud.
The rain falling is a bit unusual too.
There are 2, 4, and 3 lines.
Go back to the first floor. Surprise, surprise, the switches
are now blue. Do that thing with the switches.
You’ve put out the fire!
Go ahead and assemble the slingshot. We need a rock or a dart for it.
Actually, you already have one.
The screwdriver.
Head on up to the 3rd floor and shoot that balloon down. You know you've been wanting to do that since you first laid eyes on it!
Hey! Bad mouse!! He’s taken your key
to the mouse hole.
That naughty mouse is probably why there was
a hole chewed in the yellow pipe.
Take the tape
off the pipe. You may have to leave the floor and come back. When you do,
check the mouse hole again and the key should be gone.
It will be in the pipe.
Finally, we’ll check out Floor 0. You have a sketchy looking door, and a book with a clue: E = Escape. On floor 1,
I originally wrote this walkthrough for posting on Nordinho.net but I'll put a copy here as well, because Yukihiro Hozumi makes some beautiful and very hard games. Escape from the Yellow Room 2 Walkthrough
First room
In the opening scene, there’s a blue doorknob. Above the word “Yellow” is a window to a blue room with the word “blue”. There are two screws in the O.
To the right, take a landscape picture from the wall
by clicking the top left.
On the back is a clue
one might interpret as “up up down down.”
To the right again, a light switch and a yellow doorknob.
To the right again, a “red” window looking onto a red room, and a red doorknob.
Go to the light switch and zoom in on it. Before you click it, though, zoom in on
the 2
and take a tack.
Turn off the light and look round the room again.
By the red window you now have a lamp and a table with a vase. If you turn off the tall lamp, you can turn it on again by going to the main light and turning it on then off. The table has a locked drawer. Click the top of the table and find a pattern of 4 dots that can be changed to lines.
By the blue window you have a desk with a lamp, 3 shapes, and a book. The drawer in this desk is unlocked; take an eraser-like object. It has a pattern on the back
that could be interpreted as “right left right left”.
You now have the clues to go back to the table by the red window and open the drawer.
Combine the two clues from the picture and the brush.
Set the first dot to 3 o’clock, second to 9 o’clock, third to 3:30, fourth to 6:45.
Take a jar. It's not empty.
At the desk by the blue window, use the jar
on the book for a grid clue.
Put the pin in the picture and hang it up over the 2. Turn off all the lights. As you do so, the
ball on the floor lamp chain will come off.
When all lights are off
you’ll see a pattern on the wall.
BRR
RRB
BBR
Combine the grid with the book hint to get a color order.
RRBBRB
Turn on the light and use this clue on the red and blue objects in the room -
the doorknobs.
Click them in that order.
You’ll get… a doorknob. With a convenient screwdriver in it.
Use the SD on
“Yellow” and get an odd silver object. It’s got an indent with a tiny hole in it. Combine it with
the thumbtack, then combine this with
the ball.
It looks an awful lot like
a key.
Use this on the yellow doorknob and enter
The second room.
The door closes behind you... Whew, there’s a light switch.
By the light switch is
a smudge on the wall.
On another wall is a shelf/bowl thingy with a yellow handle. On another wall is a clock without hands. The door you entered by has vanished.
Use the eraser on
the smudge to reveal a hand.
Click where
the finger is pointing… there’s a circle, which you also click to reveal
another hand.
Click where
*that* finger is pointing --
a tiny hole.
You have one object that you can use here. Use
the screwdriver/doorknob
and enter
The third room.
Did I say this game has some serious atmosphere?
Straight ahead is a table with a book and a vase, which you can take. It’s also very, very dark and there doesn’t seem to be any other lights except the dim one over the table. Go back to room 2 and
turn off the light there. Some bloody fool electrician has wired Room 3 to light up when room 2 is off.
Go back to now-lit Room 3.
That’s much better. Now you can take another object from the desk.
The lightbulb.
It combines, eventually, with the yellow handle, and becomes
a flashlight.
On another wall is another set of dots which behave like the dots on the table in the first room. Also, while here, click around
the cone and take a knife.
Next, 3 niches shaped like a triangle, a square, and a sphere. Next wall, more or less nothing...
Look for a place to use that handy knife. You’ll find it
in the book is a mirror
Explore the desk a little more and you’ll find a place to use it,
toward the back of the desk.
Get a
green cube.
Go back to room 2 and use your
flashlight to explore. You will find a clue for the dots.
3, 6, 9:30, 3
Use that on the
dots
and get a blue triangle.
If you're trying to refer as little to this document as possible, you might feel a little stuck at this point, but there is one more thing you can do.
Close the door. Yipe!
And your knife is gone! However, you can do something else with
your flashlight.
Take it apart, then use the bulb
in the eye.
Fill your jar.
Head on back to room 2 and
pour the water into the shelf/bowl
to get your last piece.
Put all 3 items into the niches and everything will fade away. Except for
4 dots on the wall.
Walk on out and keep walking out. You’ll come to a white room with a nightstand with a drawer. Take the key. Use the key on the door.
You’ll come to an end screen with 4 dots. But
you're not really done.
Recreate the pattern and you’ll finally be able to go to bed.
I think I originally built it around 1998 as a way of learning HTML. It was never as awful as Cameron's World but was originally a longish page of text with links to other longish pages, somewhat focused on a wicked good Irish actor. ("Parchment" wallpaper, but mercifully, no animated gifs.) Within a few years a purchase of Macromedia Dreamweaver gave it a menu made of slices (does anyone remember those?) and a frame for content.
It stayed that way for well over a decade, getting the occasional content update, eventually dropping the Irish actor stuff and just focusing on falconry. For a while I was updating it pretty frequently with my falconry activities, but that got tedious and I doubted anyone was reading it anyway. I kept it around as an archive to the alt.sport.falconry FAQ (does anyone remember Usenet?) and an article about all these little maxims my sponsor taught me.
Around May I decided I finally had enough knowledge to redo the site with JQuery and CSS. I also had motivation: a chat room frequented by escape game fans was going through a lot of drama due to an out-of-control moderator/admin, and the owner had threatened to shut it down. I had been part of the chat room for about a year and liked the vibe -- very nice people, kind and supportive to each other in trying times. If the chatroom were shut down, it would need to continue elsewhere.
So I rebuilt the website (all simple and clean looking now) and tested out a couple different chat services. None of them really had the right mix of end-user fun, storing chat history, and security. (The crazy moderator was known for sockpuppetry and allegedly had hacking skills -- although from my perspective, I take "hacking skills" with a grain of salt when the description comes from end-users. Having been IT, I know all too well how end-users like to have one simple password for everywhere they go.) After several weeks experimenting with a few of the old chat users I'd managed to rope in (I'm grateful they stuck with me, registering and re-registering as we test-drove more chatboxes), I finally settled on a nice package called Blab!Chat. Granted, it's written in PHP, so aspects of security are suspect, but I could fiddle and tweak with it myself. It's now running happily with the core group of people from the old chat, which the owner shut down about a month after his threat and ran the crazy moderator off his site.
At about the same time I learned that Sonic, a well-respected Bay Area ISP, had finally begun to offer service in my area. I leaped on the opportunity to ditch my ATT service, with its utter lack of anything useful beyond basic Internet and landline, for slightly more bandwidth, real website hosting (as opposed to ATT's "storage" which hashed the names of uploaded files, making it impossible to build a website), server side scripting, and IP phone for $30 less.
So, suddenly and finally, I've hit the 21st century ;)
A couple days ago the bf suggested a new project -- write a Minesweeper game -- using Dart or Elm. I explored Elm but the functional programming paradigm is a little too foreign for moment. Dart is a mix of Java and Javascript with some nice DOM-element functions -- recognizable and comfortable -- indeed, using true Dart functions in a Dart program seems entirely optional. I bashed this out in about four days, needing only general structural questions to the bf. Right now we're doing code review with the goal of making it more Dart-like.
Apparently I'm bad at keeping up to date when APIs are changed. I looked at TacoTacoTruck recently and it failed to load any map data. It seems that instead of giving a plaintext kml file as it used to, Google Maps returns the file in zip format (kmz), even if you ask for a kml file.
So it needs to be unzipped. Here's some code:
class Fetch(webapp2.RequestHandler):
def get(self):
# urlToUse is just a little hardcoded map of a filename as key and the url as the value
url = urlToUse[self.request.path]
if url is None:
print("unexpected path: %s" % self.request.path)
returncachedData = memcache.get(self.request.path)
if cachedData is not None:
self.response.write(cachedData)
return startDownloadTime = time.time()
result = urlfetch.fetch(url)
if result.status_code == 200:
elapsed = time.time() - startDownloadTime
print("downloaded %s in %s seconds" % (url, elapsed))
bytes = io.BytesIO(result.content)
zip = zipfile.ZipFile(bytes)
# retrieve the file name of the first (and only) file in the zipfilefirstName = zip.namelist()[0]
print("unzipping %s" % firstName)
# unzip it into contents
contents = zip.read(firstName)
memcache.set(key=self.request.path, value=contents, time=cacheTime)
self.response.write(contents)
else:
print("can't fetch kml file for %s. Status=%s" % (self.request.path, result.status_code))
self.response.write('')
Due to the increasing number of user-generated panorama shots being uploaded to Google, it's been harder to find a game where you can actually navigate. I was playing today and got 4 user panoramas in a row! So I added a check to look for "Google" in the copyright info. This should nearly eliminate getting a user-generated pano.
Another minor annoyance came after you got the score window. You could click it and it would close, but the map where you made your guess didn't close along with it. Now it does.
Finally, I've added a new themed game called "New to the City." It places you in a random location but within a specific city. There's currently 24 cities to choose from, so go get lost!
About a month ago I was browsing Reddit's SF Bay Area sub, and noticed a link to maps of taco trucks in the East Bay. Taco trucks take me back to my early days in Silly and my first job (in Mountain View), and a cow-orker who introduced me to the joys of a lengua taco dripping onto a paper plate. The redditor who made the map seemed interested in a web version, so I built TacoTacoTruck. However, he has yet to follow up on whether he liked it, hated it, or just didn't have time to deal. So although the map itself is not my own work, the web version is mine and could be fed any user-made Google map.
This was actually done months ago, but I thought it would be really nice to have an ability to edit the background. So I started creating a wizard to do that, and for whatever reason, I just could not get it working the way I wanted, and got kind of depressed about that. So I dropped that bit out of the code and decided to publish as it was before.
Well, almost as it was before, with one notable exception: I took out the advertising. It's annoying to look at, and probably not going to generate any significant amount of revenue. In its place, I have put in what I'm calling a beg bar: give me a donation, the little yellow bar goes away.
My mom has gotten vertigo spells for the past 20 years or more. As she is incredibly detailed when it comes to her personal health, she has described to me every single episode and what might have caused it to happen. Quite often it's a sudden head turn, one of those unconscious moves you make when driving; sometimes it's having your head at an odd angle for an extended period of time, which happens when she gets her hair washed in the salon. Whenever it happens she usually goes to the hospital because she's old and falling has serious consequences, plus she is often unsure if she's having a heart attack. (To which I often say, Mom, if you had enough time to contemplate if you're having a heart attack, you probably aren't.)
So this morning I got to experience a bit of the joy of vertigo. And because I'm my mother's daughter, I'll describe it in loving detail.
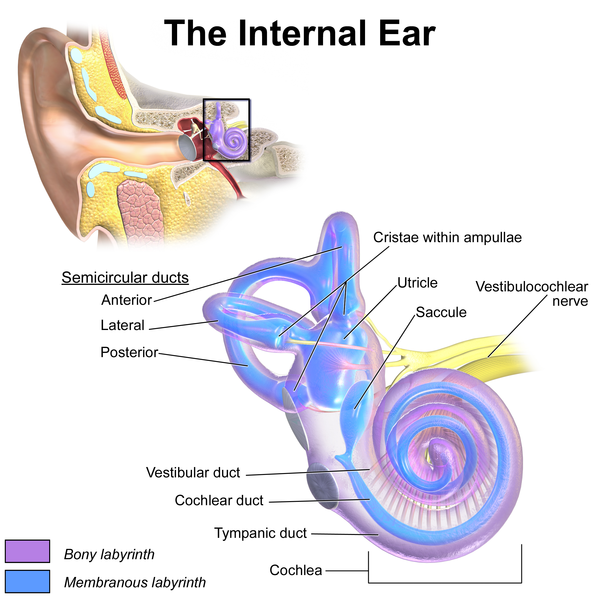
Having been on the receiving end of these stories, I almost instantly understood what had happened. I was lying in bed, having just woken up, rolled over to kiss my sweetie, and suddenly felt a bit odd inside my right ear. Almost an itchy feeling, definitely deeper than the canal, and above it, and as I am now looking at pictures of the inner ear, in the region of the semicircular canal.
I opened my eyes and things were moving like an animated GIF loop, fortunately not too fast. I sat up and it didn't go away, and that's when I said "Oh crap, I'm having vertigo like my mom gets." I felt clammy and slightly nauseated. After a few minutes holding still (except for my mouth, which was cussing out my mother for passing this weakness on to me), the spin decreased to a twitch. My guts were wanting to get rid of anything offensive, and did, fortunately in the down direction.
Staring straight ahead was okay. Almost any other direction and the reaction was surprisingly immediate: clamminess and nausea. And it would go away almost as fast when I looked in a "safe" direction. But this was not a gut problem, it was neurological. Looking at the tablet seemed okay, but I couldn't use the computer -- a little too much head tilt there, I think.
I'd researched the Epley maneuver for mom in the past, but was feeling too trembly in the guts to want to try it. When you're feeling this way, the last thing you want to do is something with high potential to make a terrific mess to clean up.
Sitting up in bed seemed to be the best thing for staying un-dizzy and mitigating the chills. My mom had been advised to sit still and stare at a fixed point, so I focused on the opposite wall. Slowly and gently I started tracking left and right, trying to increase the safe zone. It seemed to work. I pointed my gaze a foot or two higher on the wall and did the same. Repeat, raising a foot or two each time. My toes felt a little achy and I spent some time massaging them. I eventually graduated to turning my head, too. I don't know how long I spent doing this, but somewhere near the end of it, Best Boyfriend Ever came by to check on me, offered to take me to the hospital, and when I said I'd be okay, left for work. Out of everyone I've ever known intimately enough, BBE takes the second-longest time to get ready for work: two hours is average. (My mom is the first.)
As you might imagine from all this back and forth, I was also getting very sleepy.
I was pretty sure I was sleeping sitting up, in between tracking. We had had a normal amount of sleep but I was just wiped out. I carefully lay flat, not sure if this would be troublesome. It wasn't.
I sacked out for several hours. When I woke up things were 100% better. I'm taking it easy and slow this afternoon but I seem to be able to point in most any direction safely. I still itch a little bit in the ear, but I think the crystals are by and large back where they belong.
There was a trip to Germany for the boyfriend to attend a conference, and Christmas, and New Year's, so not a whole lot got done between the 15th and the 2nd. But since then it's been chin-rubbing and poking and growling, and finally the app was finished. I still need code review but right now it does just about everything I want it to.
The sticky bit was adding text. I'd originally set up the button to open an alert dialog where you could enter your text, and select a font size via a slider. That was visually jarring and functionally awkward because you couldn't really tell how large to make your text in relation to the drawing. You would only know after placing it, so you'd have to undo and try again if you found it the wrong size.
So I found a bit of code that would include an actionable graphic (an image of an X to clear the text) in an EditText. From that starting point I made the EditText so it would be placed directly on the drawing surface, and it could be resized by dragging at the corner graphic. Clicking the checkmark graphic at the top cements the text in place. It's much smoother than having a dialog box.
After that, some code to save the drawing in JSON so it can be retrieved later.
For the next trick I want to put advertising in it. I'd like have a free-with-ads version, and a paid no-ads version. Don't hurt me, please. I'm not crazy about doing it either.
So to distract you from that last paragraph, here's the code for an edittext that can be moved around and the font resized by dragging. Both the drawing and the EditText are children of a Viewgroup.
public class MovableEditText extends EditText { // 2 drawables: an OK and a resize handle private Drawable closeImg = getResources().getDrawable(R.drawable.text_ok); private Drawable resizeImg = getResources().getDrawable(R.drawable.text_resize); private long timeFingerDown; public InputMethodManager imm; private App app; private boolean resizing; private TextCompletedListener textListener; private boolean finished = false; private float startDeltaLeft; private float startDeltaTop; float leftMargin = 100; float topMargin = 100; public MovableEditText(Context context) { super(context); app = (App) context.getApplicationContext(); imm = (InputMethodManager) context.getSystemService(Context.INPUT_METHOD_SERVICE); init(); } @Override public void scrollTo(int x, int y) { super.scrollTo(0, 0); } @Override public boolean onTouchEvent(MotionEvent event) { switch (event.getAction()) { case MotionEvent.ACTION_DOWN: timeFingerDown = event.getEventTime(); // Remembers where you grabbed the text startDeltaLeft = event.getX(); startDeltaTop = event.getY(); setCursorVisible(true); return true; case MotionEvent.ACTION_UP: resizing = false; // clicking on the OK checkbox if (event.getY() < getPaddingTop() + closeImg.getIntrinsicHeight()) { MovableEditText.this.okButtonClick(); } // otherwise, act like a proper edittext if (event.getEventTime() - timeFingerDown < 200 && !finished) { super.onTouchEvent(event); } return false; case MotionEvent.ACTION_MOVE: if (event.getX() > getWidth() - getPaddingRight() - resizeImg.getIntrinsicWidth()) { resizeBox(event); // we touched the arrow, so we are resizing the box (i.e. increasing font size) resizing = true; return true; } if (event.getEventTime() - timeFingerDown > 200 && !resizing) { // we are moving the box; close the keyboard imm.hideSoftInputFromWindow(getWindowToken(), 0); moveBox(event); } return true; case MotionEvent.ACTION_CANCEL: resizing = false; return false; } return true; } public void setTextCompletedListener(TextCompletedListener l) { textListener = l; } private void init() { setMinimumHeight(closeImg.getIntrinsicHeight()*2); setMinimumWidth(closeImg.getIntrinsicWidth()+resizeImg.getIntrinsicWidth() *2); // Set bounds of the Clear button so it will look ok closeImg.setBounds(0, 0, closeImg.getIntrinsicWidth(), closeImg.getIntrinsicHeight()); resizeImg.setBounds(0, 0, resizeImg.getIntrinsicWidth(), resizeImg.getIntrinsicHeight()); // There may be initial text in the field, so we may need to display the button showOkButton(); //if text changes, take care of the button this.addTextChangedListener(new TextWatcher() { @Override public void onTextChanged(CharSequence s, int start, int before, int count) { MovableEditText.this.showOkButton(); } @Override public void afterTextChanged(Editable arg0) { } @Override public void beforeTextChanged(CharSequence s, int start, int count, int after) { } }); } private void moveBox(MotionEvent event) { leftMargin += (int) (event.getX() - startDeltaLeft); topMargin += (int) (event.getY() - startDeltaTop); requestLayout(); } // the following is to be used by drawview when resizing and panning public void externalMove(float dragX, float dragY) { leftMargin = (int) (leftMargin + dragX); topMargin = (int) (topMargin + dragY); requestLayout(); } private void resizeBox(MotionEvent event) { setWidth((int) event.getX()); setHeight((int) event.getY()); resizeText(); } // change the text size to whatever will fit in the box private void resizeText() { String[] multiline = this.getText().toString().split("\n"); float adjustedHeight = (getMeasuredHeight()/multiline.length - getCompoundPaddingBottom() - getCompoundPaddingTop())/2; setTextSize(adjustedHeight); } // if there is text, add the OK button void showOkButton() { if (this.getText().toString().equals("")) { // remove the clear button this.setCompoundDrawables(this.getCompoundDrawables()[0],null, resizeImg, this.getCompoundDrawables()[3] ); } else { //add clear button this.setCompoundDrawables(this.getCompoundDrawables()[0], closeImg, resizeImg, this.getCompoundDrawables()[3]); } } void okButtonClick() { MyViewGroup viewGroup = (MyViewGroup) getParent(); // get the text, get the size, get the position, create a Stroke from it // locate this view in the viewgroup's coordinate system // the screen coordinates minus the location of the MET Float deltaL = getLeft() - getScrollX() - viewGroup.dv.getCenterX(); Float deltaB = getTop() - getScrollY() + getBaseline() - viewGroup.dv.getCenterY() ; // viewcenterxy are the canvas coordinates Float dvViewCenterX = viewGroup.dv.getViewCenterX(); Float dvViewCenterY = viewGroup.dv.getViewCenterY(); Float scaleFactor = viewGroup.dv.getScaleFactor(); // translate that delta to the canvas's coordinates Float translatedL = dvViewCenterX + (deltaL/scaleFactor); Float translatedB = dvViewCenterY + (deltaB/scaleFactor); if (this.getText().toString().length()>0) { app.setText(getText().toString()); app.setTextSize(getTextSize()/2); // i do not know why it keeps doubling the size app.strokeInProgress = new TextStrokeBuilder(app, translatedL, translatedB, scaleFactor); app.finishStroke(); } // tell viewgroup to delete the EditText textListener.onTextCompleted(); finished = true; imm.hideSoftInputFromWindow(getWindowToken(),0); } public void setLeftMargin(float left) { leftMargin = left; } public void setTopMargin (float top) { topMargin = top; } }